Salesforce, where I've spent the last seven years, has a pretty reasonable policy toward sharing design work in portfolios—just put anything that's non-public behind a password.
My site, charliegleason.com is built in Remix, and it's open-source. Which makes putting case studies about my work on enterprise software tricky.
I was talking to Glen Maddern, and he mentioned that given it's being deployed on Cloudflare Pages, I could just wrap the public site in a private repo and add the protected routes that way. Genius.
How does it work?

There's a couple of gotchas with this approach, but it's relatively straightforward.
Create a new project with
npm initSet up a folder structure that matches the repo you're going to be injecting these private routes into
Install your public Remix site's GitHub repo as an NPM dependency with
npm install git://github.com/USER_NAME/REPO_NAME.git#branch(usually main)Create a
.dev.varsfile in your private repo to manage any environment variables if you have themUse concurrently and sync-directory to sync your files to the
node_modules/REPO_NAME, where repo is the name of your repository
You can see the package.json I use for this below:
{
  "name": "auth.charliegleason.com",
  "version": "1.0.0",
  "main": "index.js",
  "scripts": {
    "dev": "concurrently \"npm run sync:watch\" \"npm --prefix node_modules/charliegleason.com run dev\"",
    "postinstall": "npm run sync && npm --prefix node_modules/charliegleason.com install && cp .dev.vars node_modules/charliegleason.com",
    "sync": "npm run sync:files:routes && npm run sync:files:assets && npm run sync:files:data",
    "sync:watch": "concurrently \"npm run sync:files:routes -- -w\" \"npm run sync:files:assets -- -w\" \"npm run sync:files:data -- -w\"",
    "sync:files:routes": "syncdir routes node_modules/charliegleason.com/app/routes --exclude .DS_Store",
    "sync:files:data": "syncdir app/data node_modules/charliegleason.com/app/data --exclude .DS_Store",
    "sync:files:assets": "syncdir public node_modules/charliegleason.com/public --exclude .DS_Store",
    "update": "npm install git://github.com/superhighfives/charliegleason.com.git#main && npm install"
  },
  "dependencies": {
    "charliegleason.com": "github:superhighfives/charliegleason.com#main",
    "concurrently": "^8.2.2",
    "sync-directory": "^6.0.5"
  }
}
Breaking it down
So, what does each of these scripts actually do? Let's go through step-by-step.
npm run dev
Start watching files, and sync when they change. Start the dev server.
concurrently \"npm run sync:watch\" \"npm --prefix node_modules/charliegleason.com run dev\""npm run postinstall
Run the initial sync, install the dependencies for the public repo, and copy your local .dev.vars into it.
npm run sync && npm --prefix node_modules/charliegleason.com install && cp .dev.vars node_modules/charliegleason.com"npm run sync
Sync your various files, but don't worry about doing it concurrently.
npm run sync:files:routes && npm run sync:files:assets && npm run sync:files:datanpm run sync:watch
Sync your various files, but this time, also watch them. (There's probably a more succinct way of doing this, but it's for a personal project, so.)
concurrently \"npm run sync:files:routes -- -w\" \"npm run sync:files:assets -- -w\" \"npm run sync:files:data -- -w\"npm run sync:files:routes,data,assets
For each directory you want to sync, add syncdir PRIVATE_REPO_FOLDER PUBLIC_REPO_FOLDER. I ran into some issues with .DS_Store files getting copied over on Mac and causing mayhem, so I excluded them.
syncdir routes node_modules/charliegleason.com/app/routes --exclude .DS_Storenpm run update
Force an update for the public repo if you run into any weirdness with stuff not updating. Not strictly necessary, but I came across it a couple times.
npm install git://github.com/superhighfives/charliegleason.com.git#main && npm installOne of the nice little features of this setup is that you can easily work on the public and private stuff at the same time. Because it's all just package.json under the hook, you can take advantage of npm link. Let's say we've got two repos, charliegleason.com and a private repo. You can jump into the ~/Development/charliegleason.com repo and run npm link. Then jump into the private repo and run npm link "charliegleason.com". Boom. Magic. ✨
The only thing to watch our for here is that your private files will end up inside your public repo locally, so just make sure you don't commit anything on the public side that you don't want to.
Deployment
When you're ready to deploy your site, you'll need to set up a new Cloudflare Pages project on the Cloudlare dashboard.
Navigate to Workers & Pages > Create Application > Pages > Connect to Git.
Use the following settings:
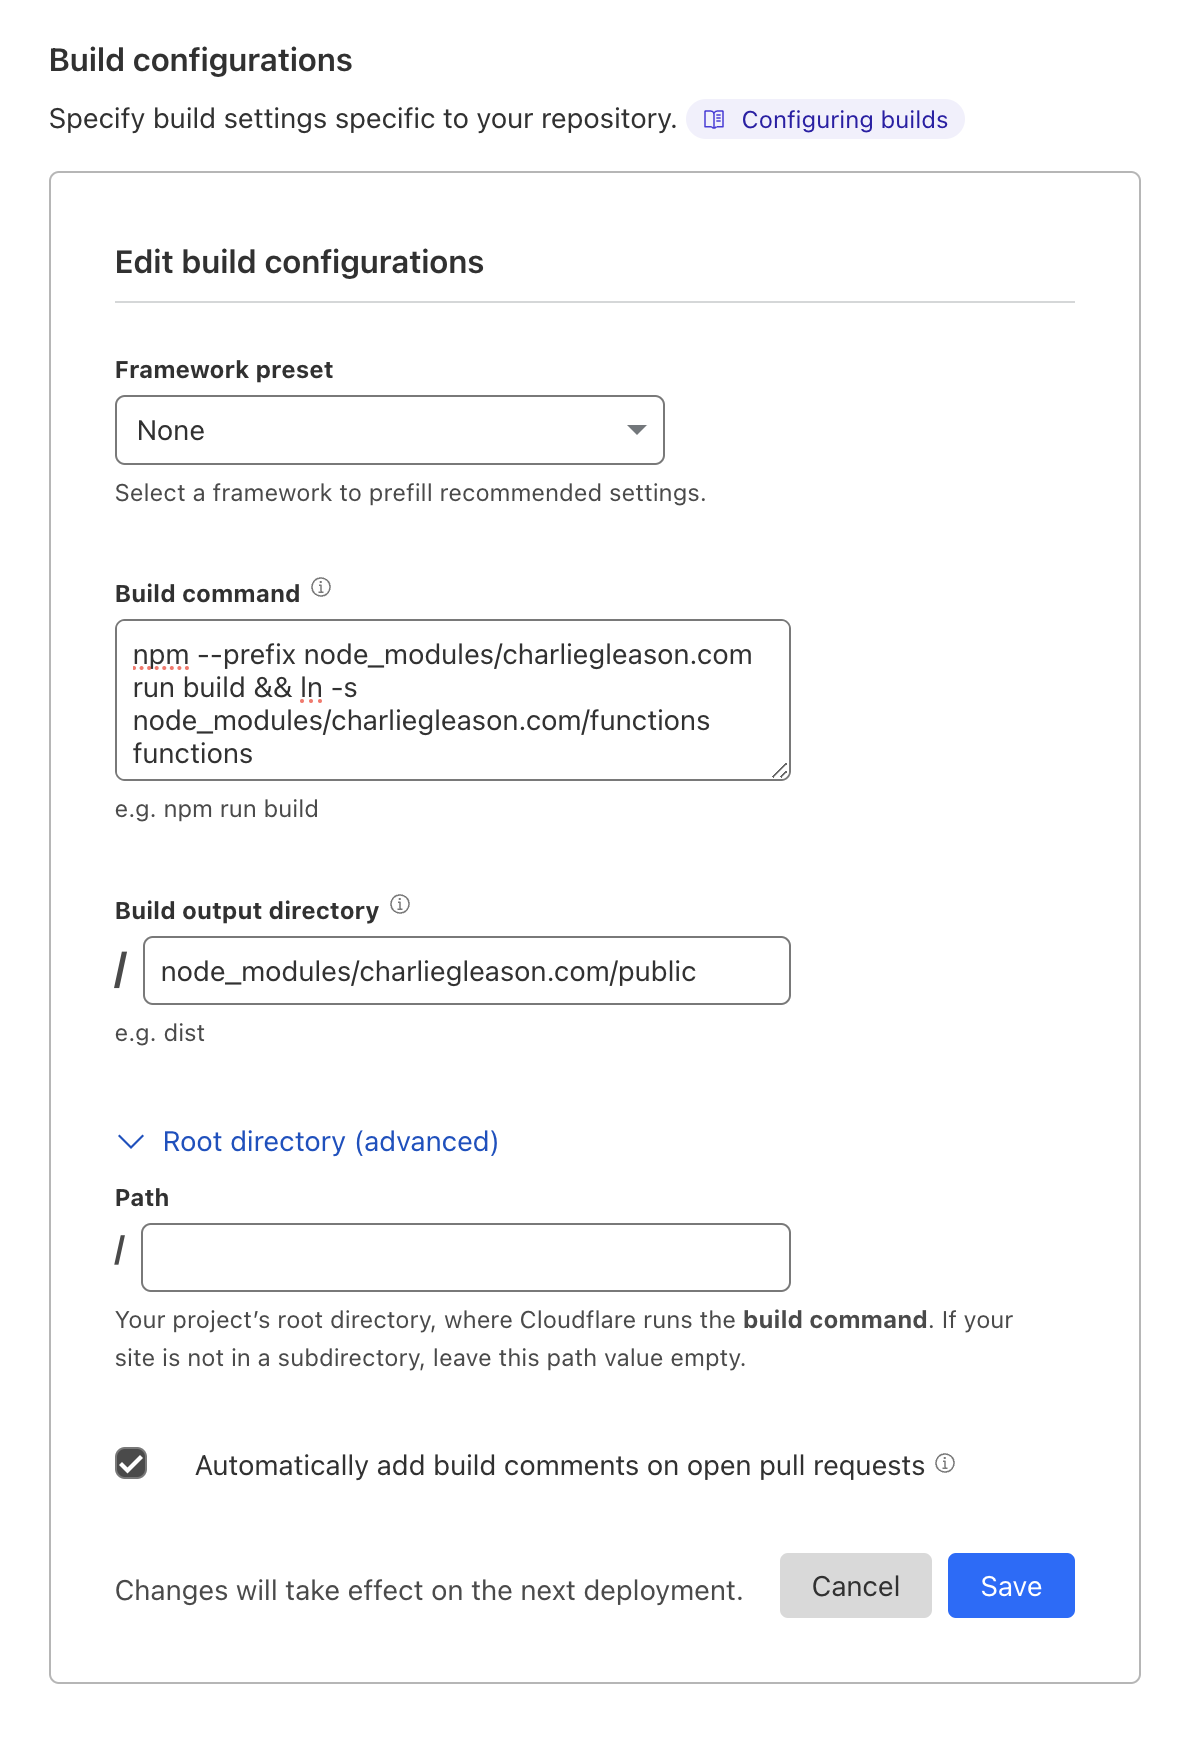
Build command
npm --prefix node_modules/REPO_NAME run build && ln -s node_modules/REPO_NAME/functions functionsNOTE
You'll need to update the REPO_NAME with the name of your repo. In the example screenshot, the repo is charliegleason.com.
This will build your public repo on Cloudflare, and create a symbolic link of your functions directory to the root, where Cloudflare expects it.
Build output directory
node_modules/REPO_NAME/publicNOTE
Again, update the repo name.
On deploy, Cloudflare will run the postinstall script inside your package.json, handling the syncing of assets and routes you defined earlier. It'll then build the public repo with the private assets and routes.
And just like that, you'll be serving your private routes alongside your public ones. Everyone wins!